A search feature enhances the user experience of a website by allowing the user to find what they’re looking for easily and quickly. More so for large websites, e-commerce sites, and sites with dynamic content (news sites, blogs).
Apache Solr is one of the most popular search platforms used by websites of all sizes. It is an open-source search engine based on Java that lets you search through large amounts of data, like articles, products, customer reviews and more. Take a deeper look into Apache Solr in this article.
Check out this article to learn how to configure Apache Solr in Drupal
Why is Apache Solr so popular?
Apache Solr is fast and flexible and allows for full-text search, hit highlighting (highlights the matching search term), faceted search (a more refined search), real-time indexing (allows new content to be indexed immediately), dynamic clustering (organizes search results into groups), database integration, NoSQL features (non-relational database) and rich document handling (to index a wide variety of document formats like PDF, MS Office, Open office).
Some good-to-know facts about Apache Solr:
- It was initially developed by CNET networks, inc. as a search engine for their websites and articles. Later, it was open-sourced and became a top-level Apache project.
- Supports multiple programming languages like PHP, Java, Python, and Ruby. It also provides APIs for these languages.
- Has built-in support for geospatial search, allowing to search content based on its location. Especially useful for sites like real estate websites, travel websites, etc.
- Supports advanced search features like spell checking, autocomplete, and custom search via APIs and plugins.
- Uses Lucene for indexing and searching.
What is Lucene
Apache Lucene is an open-source Java search library that lets you easily add search or information retrieval to the application. It is versatile, powerful, accurate, and works on an efficient search algorithm.
Although known for its full-text search capabilities, Lucene can also be used for document classification, data analysis and information retrieval. It also supports many languages other than English like German, French, Spanish, Chinese, Japanese, and more.
What is Indexing?
All search engines begin with indexing. Indexing is the processing of original data into highly efficient cross-reference lookup to facilitate rapid search.
Search engines don’t index data directly. The texts are first broken into tokens (atomic elements). Searching is the process of consulting the search index and retrieving the doc matching the query.
Advantages of indexing
- Fast and accurate information retrieval (collects, parses and stores)
- Without indexing, the search engine requires more time to scan every document
Indexing flow

First, the document will be analyzed and split into tokens. All those tokens will be indexed to the inverted index. Inverted index is a way in which Solr builds the index.
How inverted indexing works
Lets consider we have 3 documents:
- I love chocolate (D 1)
- I ordered chocolate cake (D 2)
- I prepared big vanilla cake (D 3)
The way it is tokenized is as shown in the 2nd column of the below table.
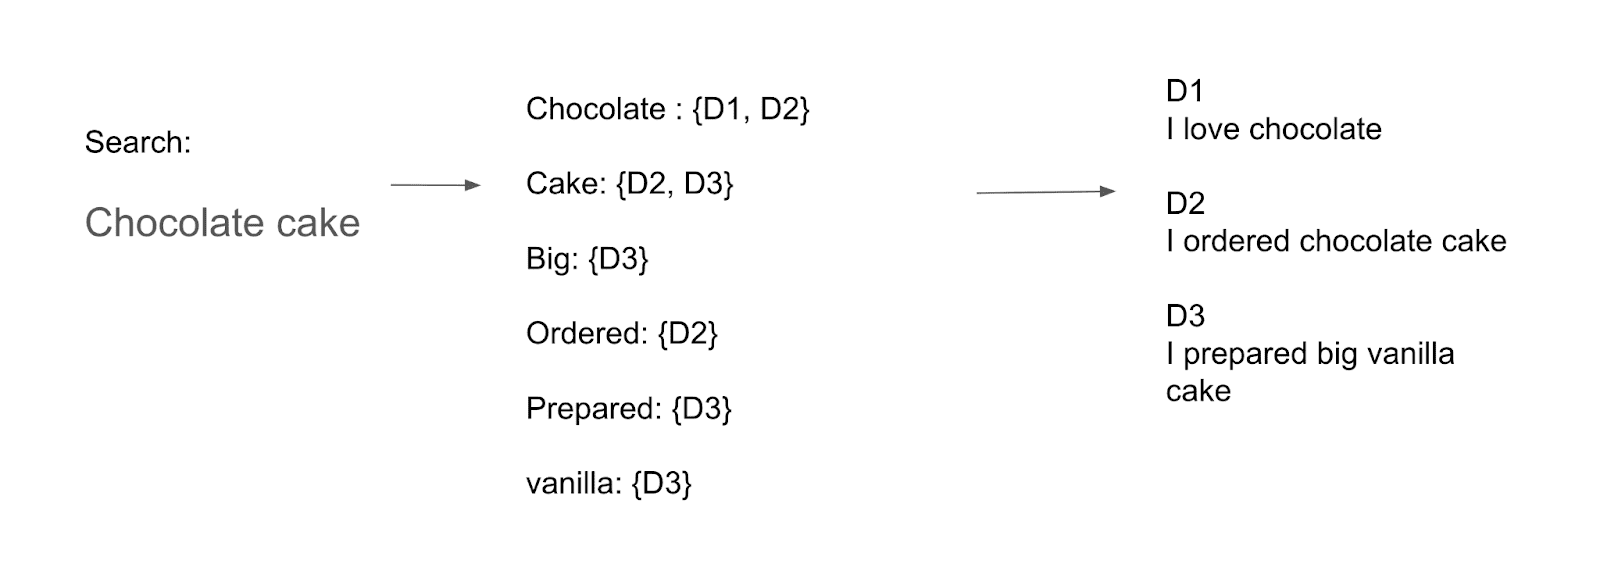
“Chocolate” is available in D1 and D2
“Cake” is available in D2 and D3
“Big” is available in D3
“Ordered” is available in D2
“Prepared” is available in D3
“Vanilla” is available in D3
You will notice that words like “I”, “love” are not tokenized. These are called Stop words which will not be indexed or searchable by Solr.
So when someone searches for the term “Chocolate Cake”, the engine looks into the index. Instead of looking for the document, it first looks into the index to see which documents do the words “Chocolate” and “Cake” fall under. This makes it easy and faster to fetch the particular document only. This is called inverted indexing.
Storage Schema
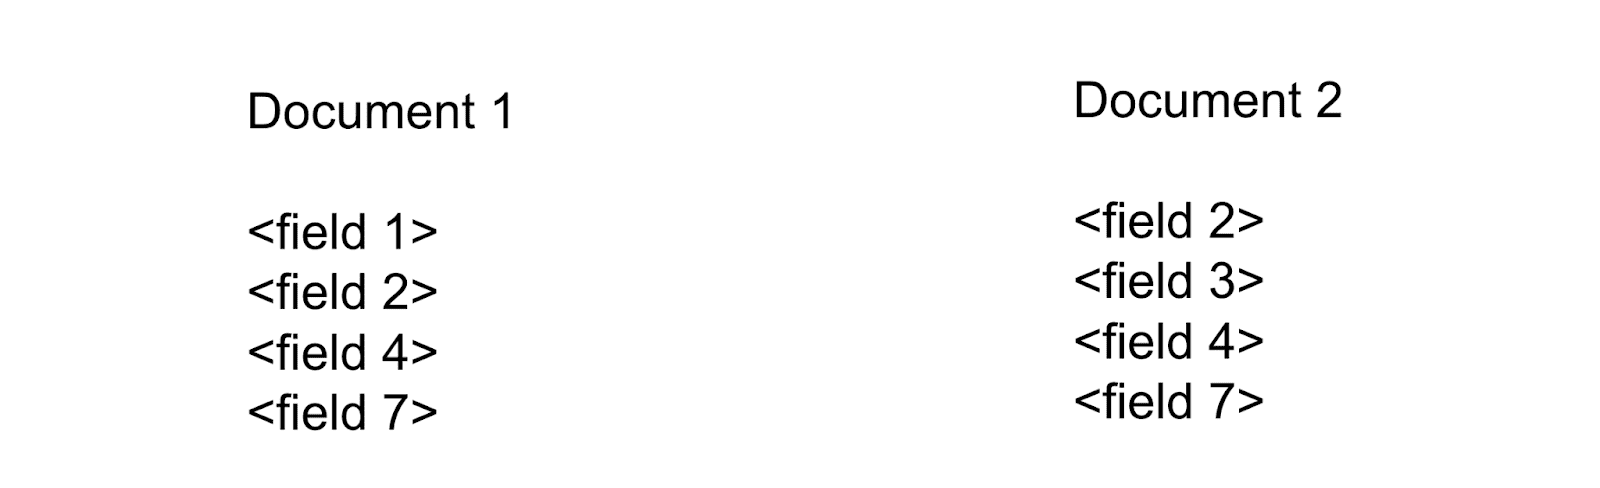
Apache Solr uses a document-based storage schema and stores every piece of data as a separate document within a collection. This allows for efficient and flexible storage and retrieval of data.
In Drupal, each node is considered as a document. So when you index your node to Apache Solr, it is considered as a document. Each document can contain multiple fields. Lucene does not have common global schema. Which means you can index any type of field in each document in Apache Solr.
How to Install Apache Solr
- First, make sure you have Java installed on your system.
- Next, let’s install Solr from here: https://solr.apache.org/downloads.html
- Download and extract Solr.
- Run this command on the Solr folder.
◦ bin/solr -e techproducts
This will create a dummy core for demonstration and it will also start the Solr server.
- Once the server has started, go to your browser and type “http://localhost:8983/”.
- Make sure Solr is installed successfully with dummy core.
Directory Structure
Once you have installed Solr, you will see many folders like:
Docs – contains documentation about Solr
Dist – Solr main .jar file
Contrib – contains add-on plugins and specialised features of Solr
Bin – scripts of Solr
Example – contains demonstrate solr capabilities
Server – heart of Solr. Contains Solr web application, logs, Solr core
Config files
To create a core, we need two files mandatory.
- Schema.xml
- Solrconfig.xml
Schema.xml
- It will contain the types of fields you plan to support and how those types should be analyzed.
Solrconfig.xml
- Contains various settings that controls the behavior of a Solr core like request handler, request dispatcher, query components, update handlers, etc.
Querying in Solr
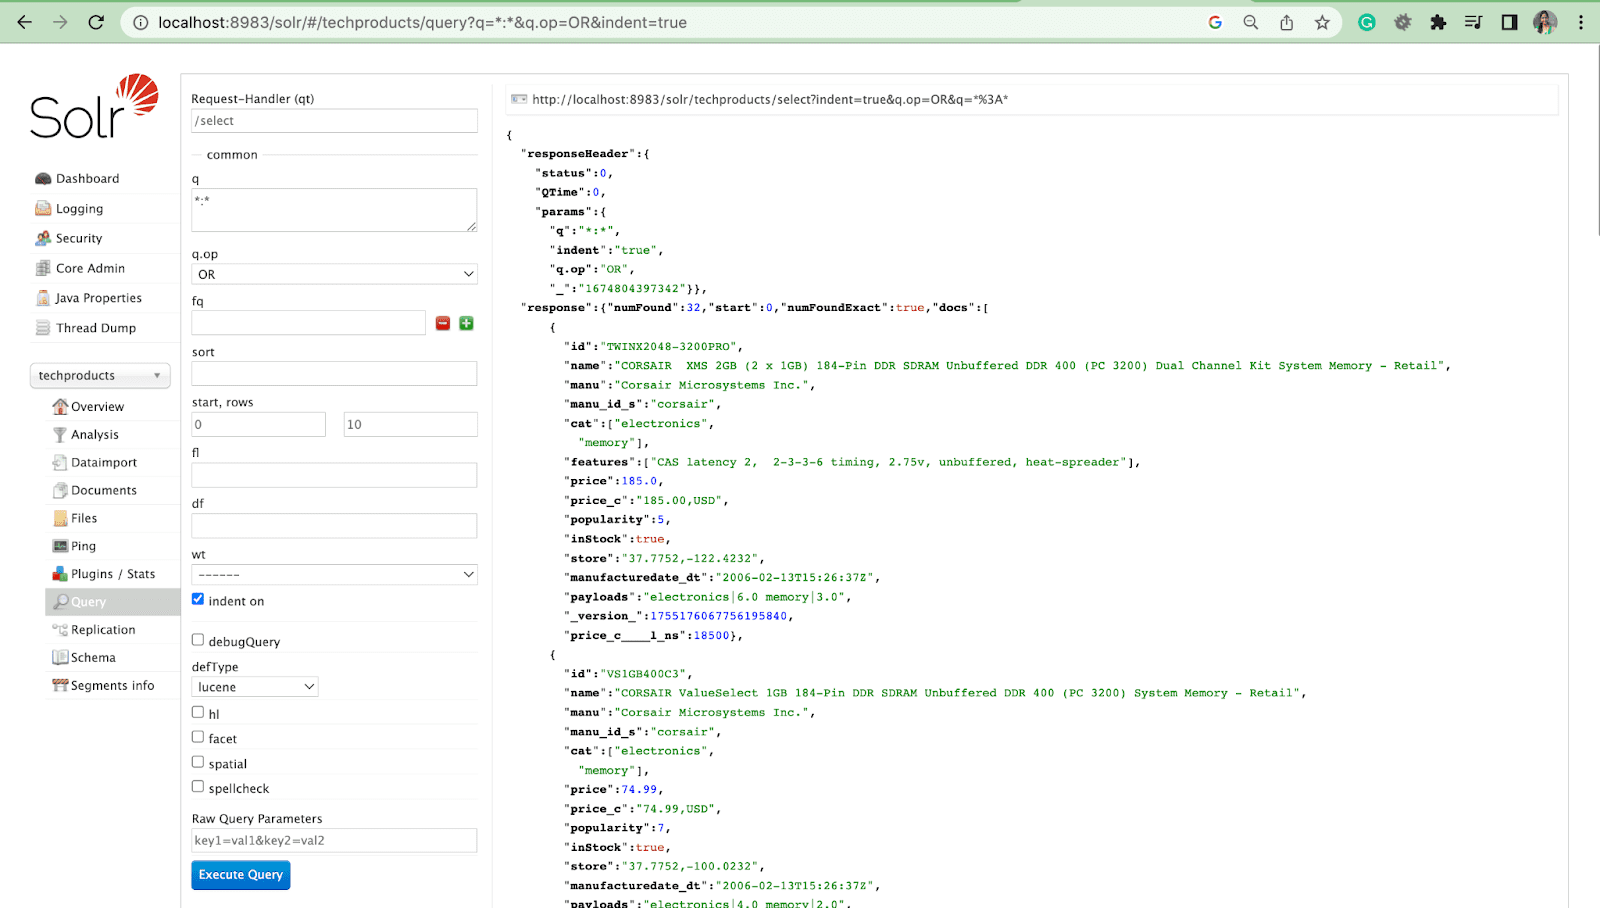
Now lets see how to query the Solr results in the Solr admin UI.
Query Parameter
- Local parameters are arguments in a Solr request that are specific to a query parameter.
For example: cat: electronics

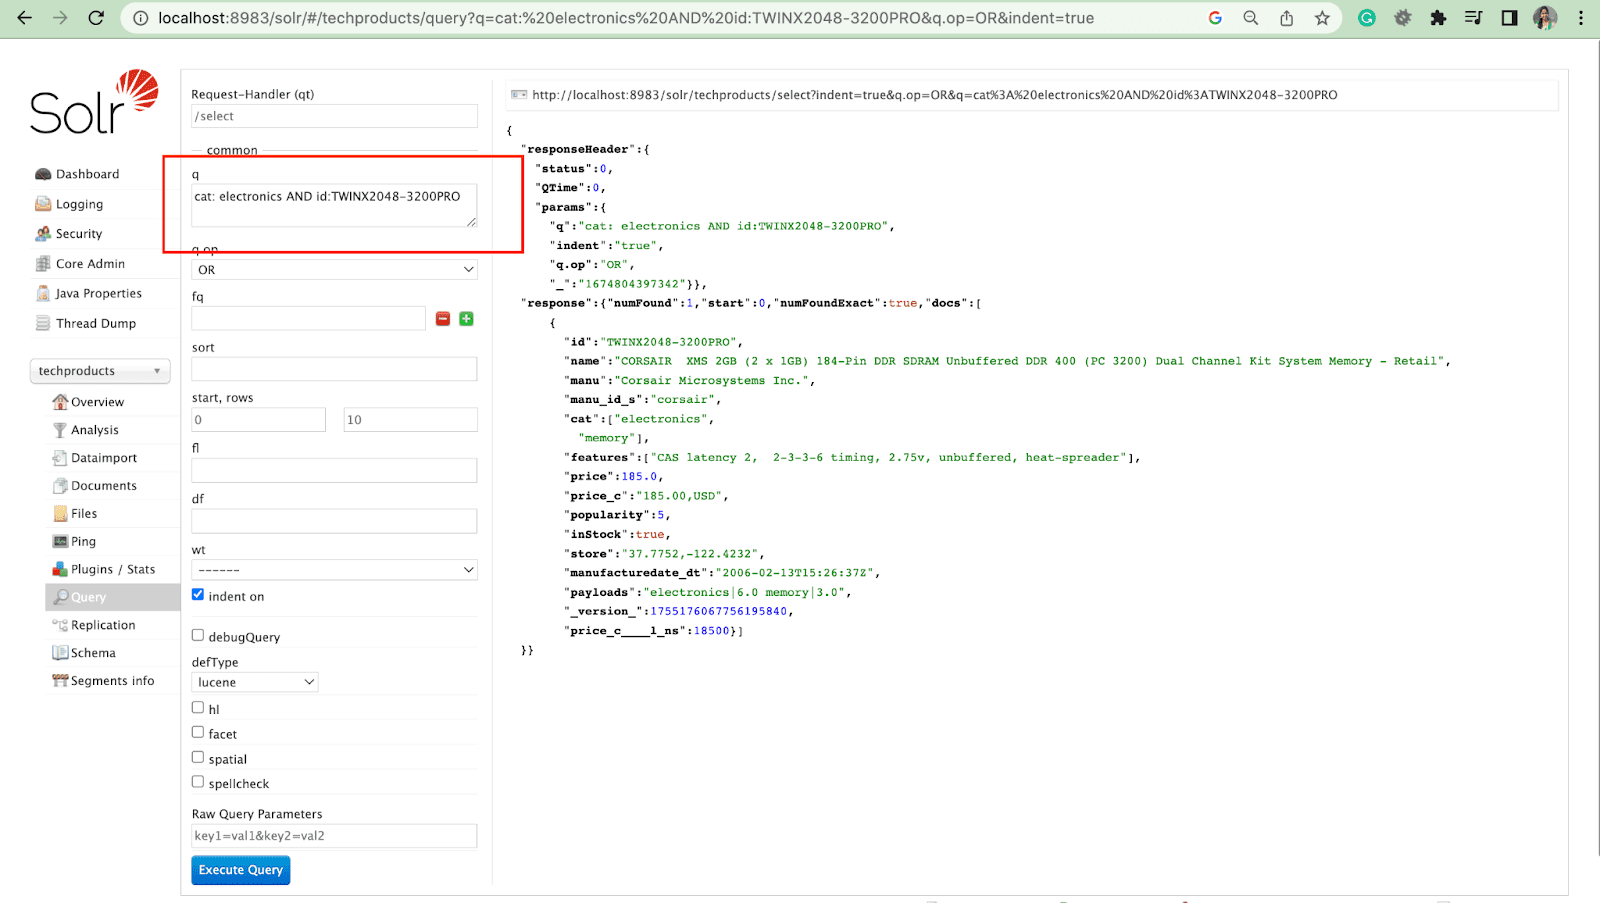
Query Parameter with operations
- We can query multiple fields with operation.
For example: cat: electronics id:TWINX2048-3200PRO with q.op AND
[OR]
cat: electronics AND id:TWINX2048-3200PRO

[OR]
Filter Query
A filter query helps narrow down the results of a search. A query can be specified by the fq parameter to restrict which documents are returned in the superset, without affecting the score.

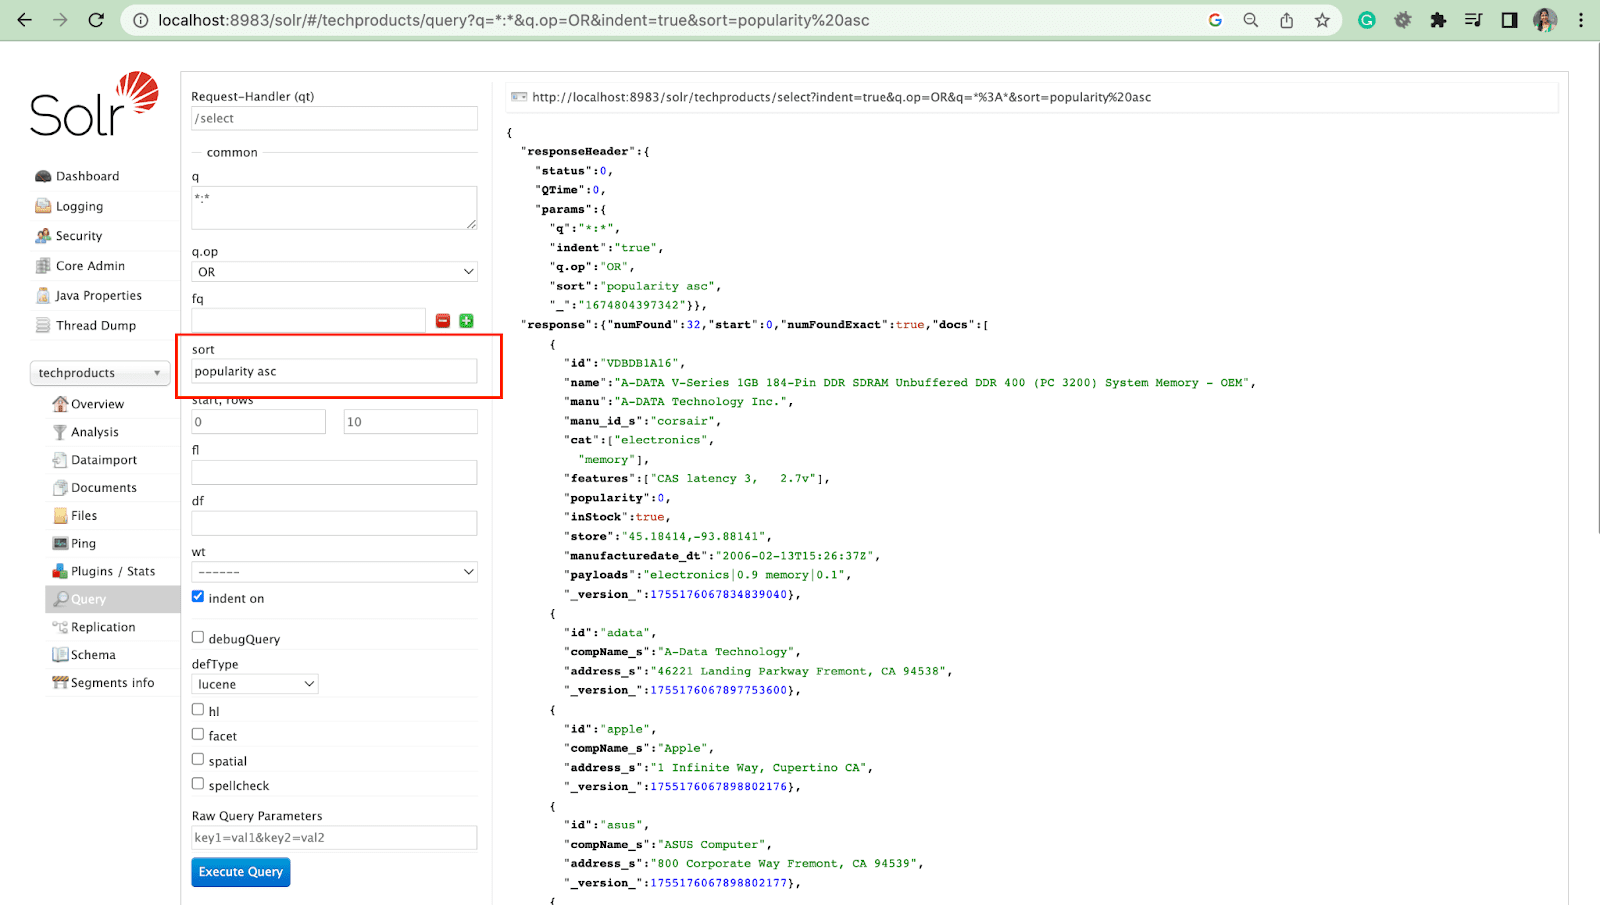
Sort Parameter
The sort parameter arranges search results in either ascending (asc) or descending (desc) order. Depending on the content, the parameter can be used either numerically or alphabetically.
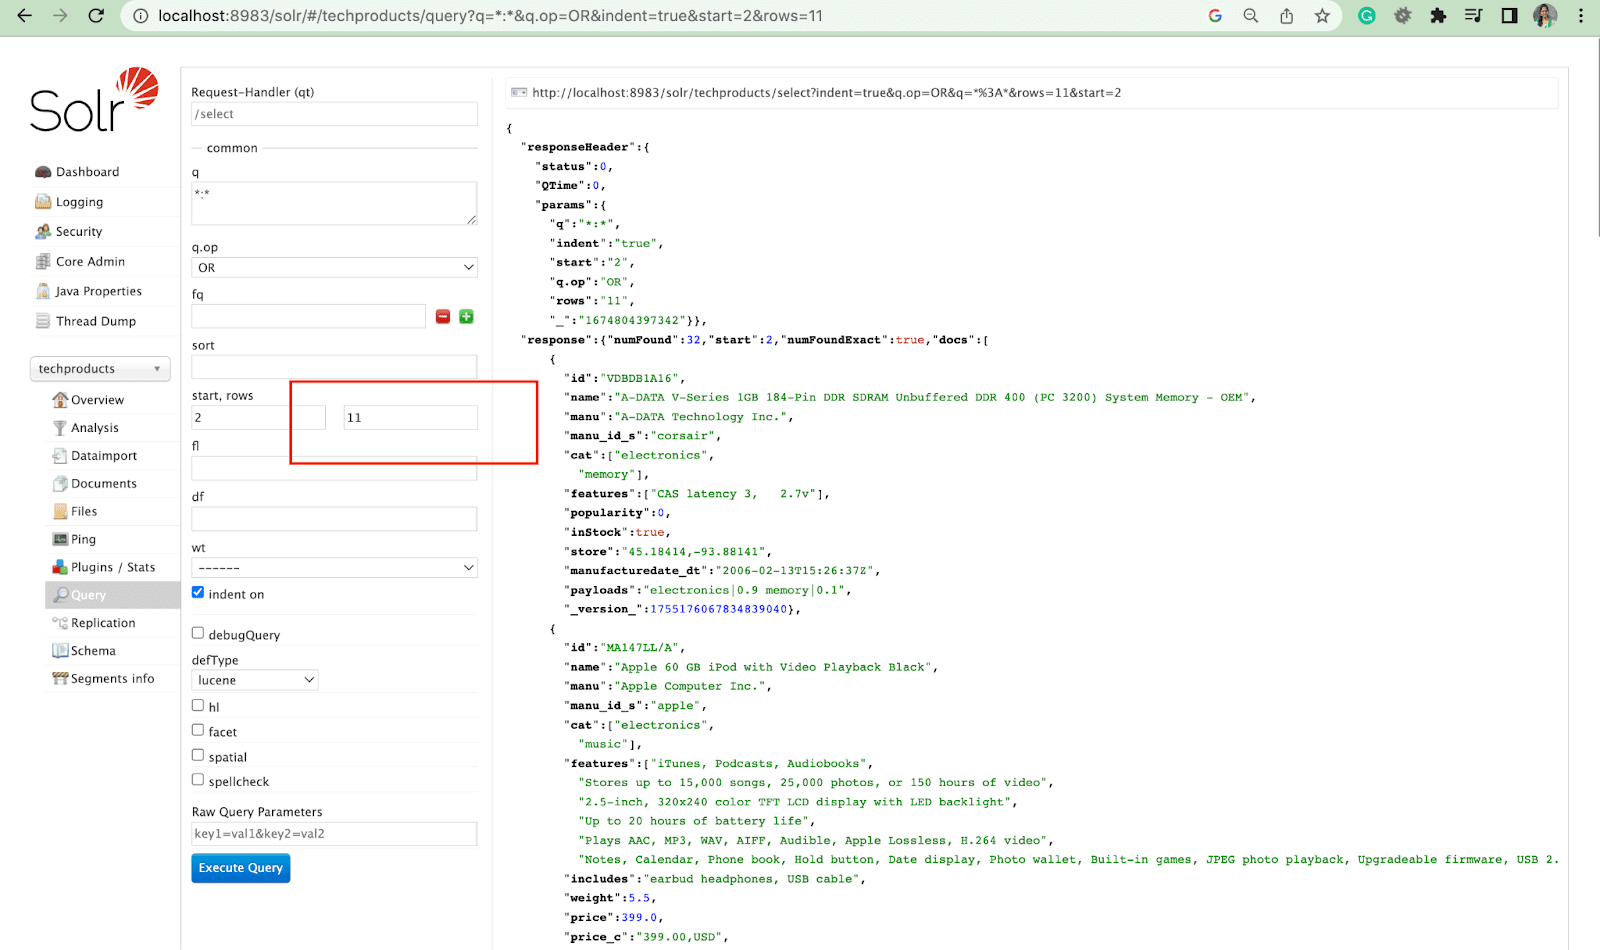
Rows Parameter
The rows parameter allows you to paginate results from a query.
Field List Parameter
The fl parameter limits the information included in a query response to a specified list of fields.

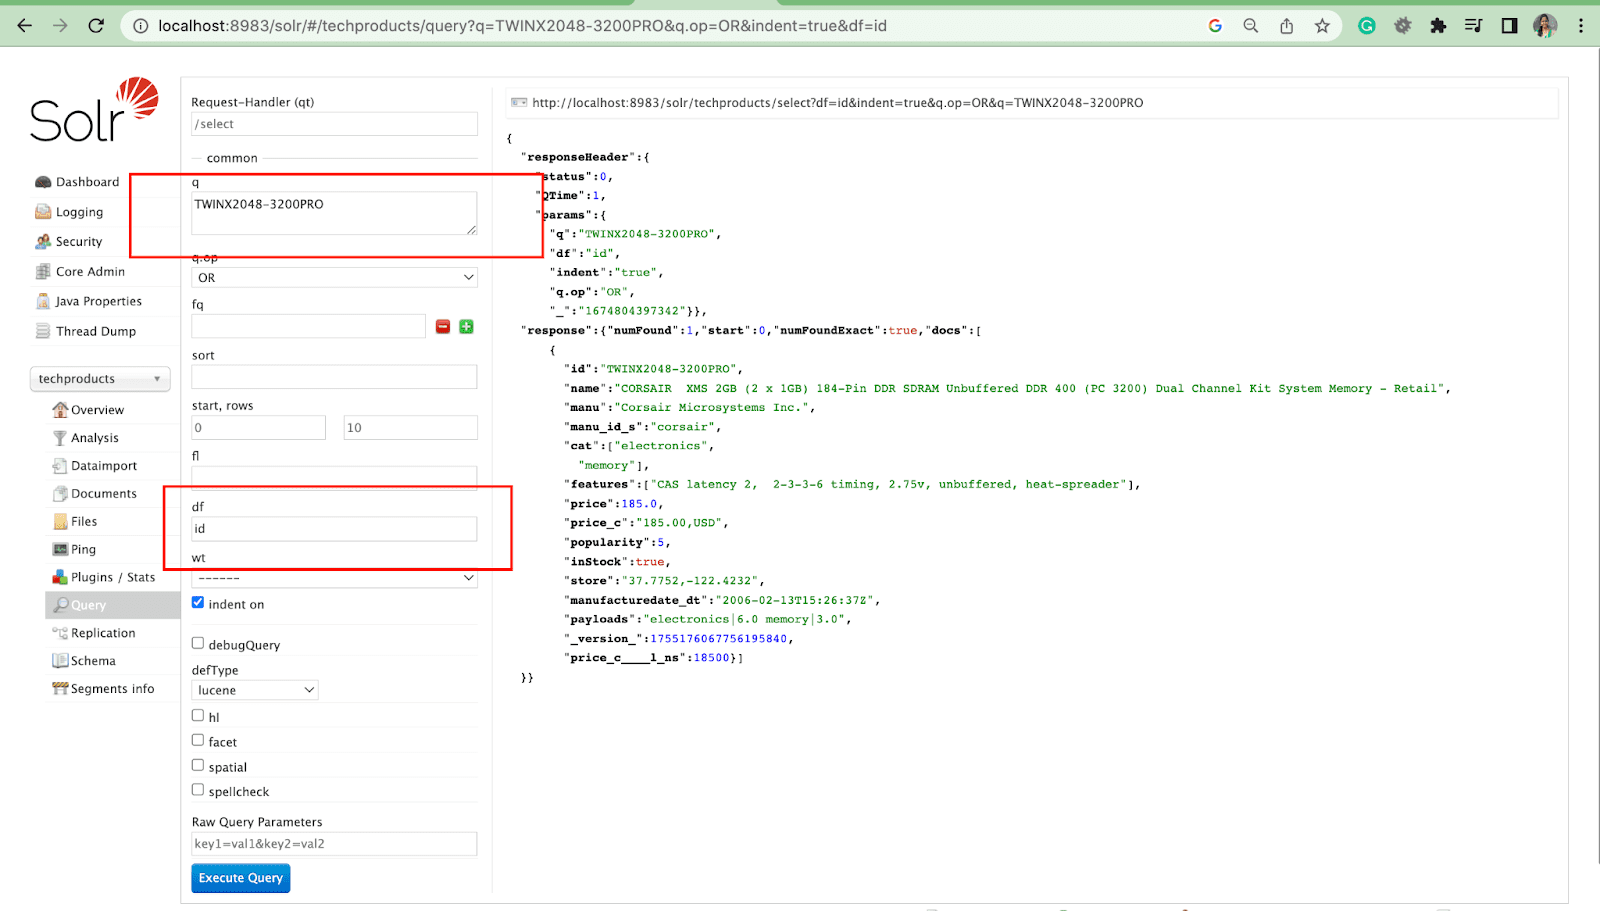
Default field Parameter
Default field parameter is the default field for query parameter.
Highlights Parameter
The highlight feature in Solr enables the inclusion of fragments of documents that match a query.

Some of the most common highlight parameters are:
- Hl.fl – Highlights a list of fields.
- Hl.simple.pre – Specifies which “tag” should be used before a highlighted word.
- Hl.simple.post – Specifies which “tag” should be used after a highlighted term.
- hl.highlightMultiTerm – If it is set to true, Solr will highlight wildcard queries. If false, they won’t be highlighted at all.

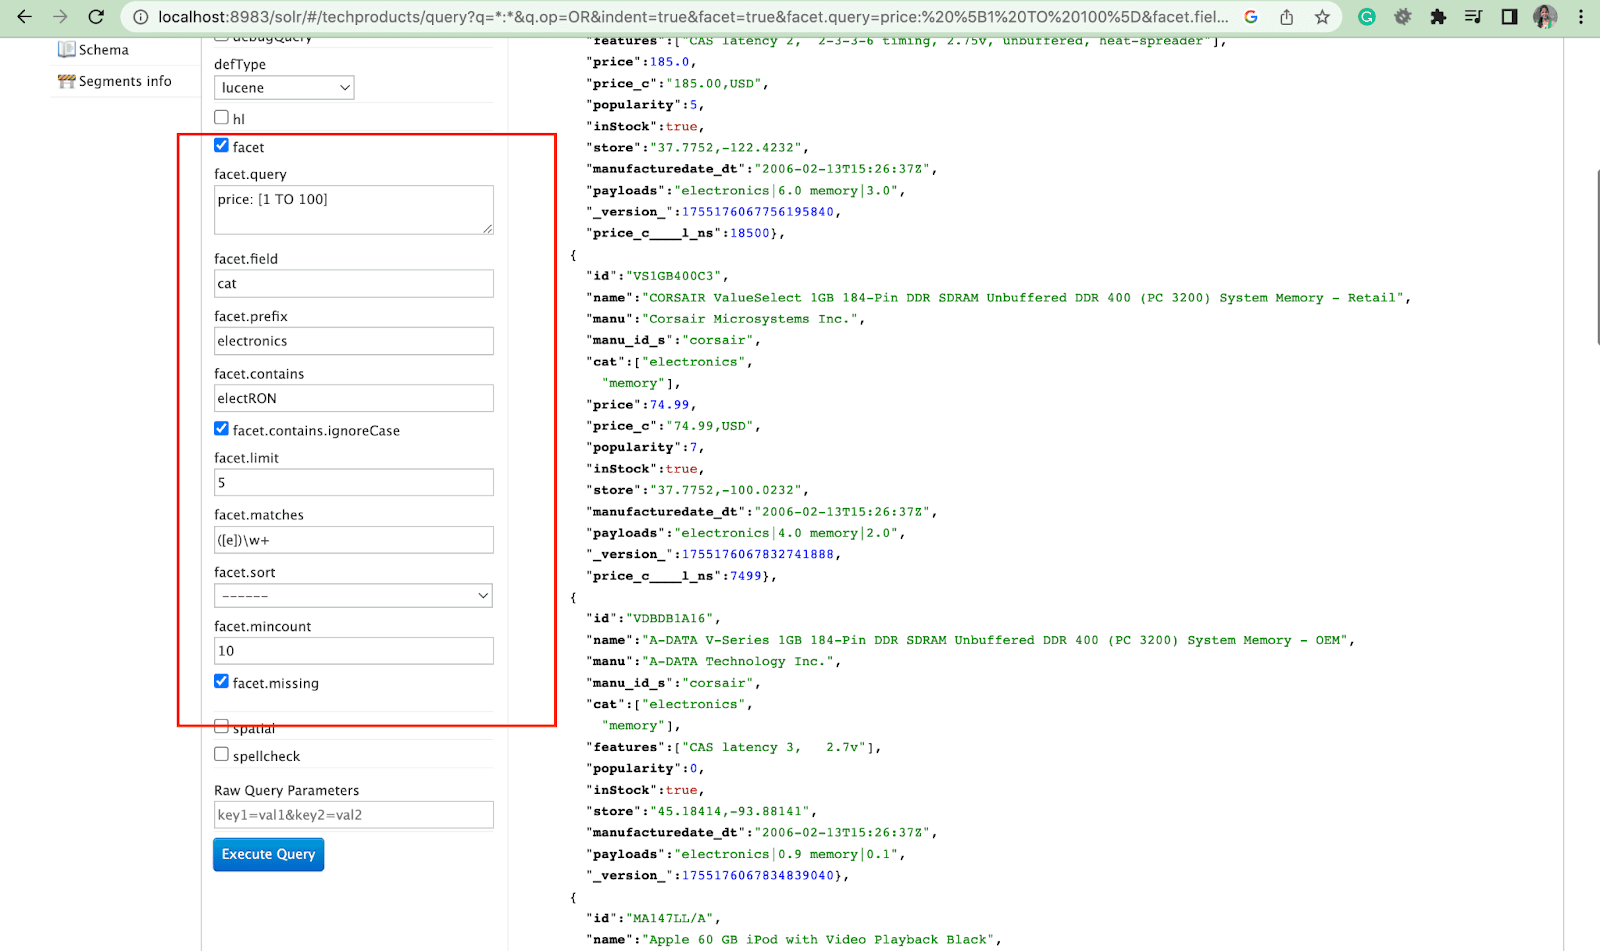
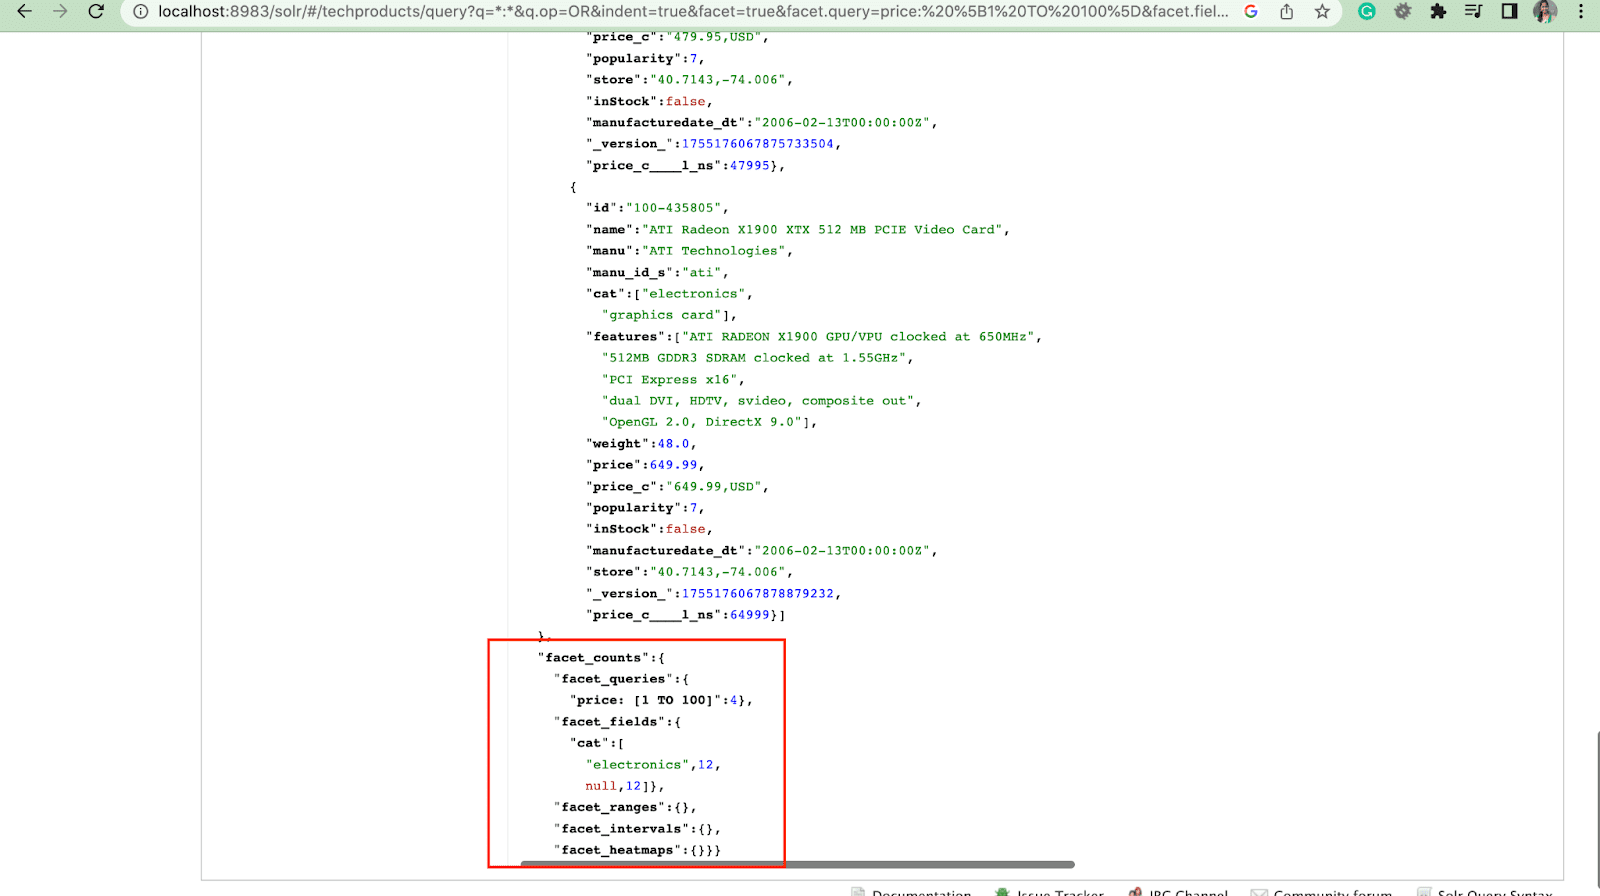
Facet:
Facets enable users to explore and refine large sets of search results. They’re displayed in a UI as checkboxes, dropdowns or other controls. The two general parameters to control facets are:
- Facet parameter
Using the facet parameter, users can generate facets based on the values of one or more fields in their search index. In the search results, the facet parameter can be configured to control how facets are generated and displayed.
2. Facet.query paramater
When a user includes a facet.query parameter in their Solr query, Solr will generate a list of facet counts that correspond to the number of documents in the index that match each query. Facet.query is useful when you want to generate facets based on complex search criteria that can’t be easily represented using a simple field value.
There are several other facet parameters like the facet.field (to specify the fields that should be used to generate facets), facet.limit (max number of facets to display for each field), facet.mincount (min number of document needed for the facet to be included in the response), facet.sort (specifies the order in which the facet values should display).
Final Thoughts
Apache Solr is a highly versatile search engine that comes with many interesting features which can be customized as per your requirements. Drupal works extremely well with Apache Solr. If you’re looking for Drupal experts to configure a powerful search engine for your new project, we would love to take it further!


